Passport makes it easy to segregate your Bitcoin into different sections for different purposes. These sections are called 'Accounts' and your device is capable of generating as many as you need, all backed up by the same seed words and/or backup file.
Upon setup, Passport begins with just one 'Primary' account. If you'd like to learn how to add more, click here.
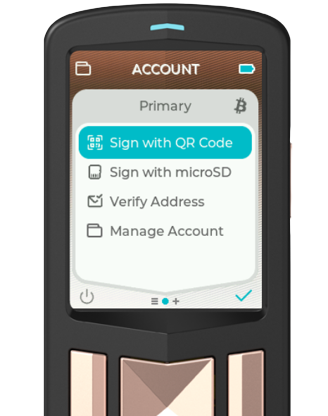
¶ Sign with QR Code
Sign a transaction by scanning QR codes. Passport supports two standards for parsing data from QR codes:
- Blockchain Commons UR1.0 (supported by wallets like BlueWallet, Specter, BTCPay)
- Blockchain Commons UR2.0 (supported by wallets like Envoy and Sparrow)
At this time, Passport is unable to sign transactions in a single unformatted QR code. The only affected wallet that we know of is Electrum.
This selection also can parse other QR codes. For example, you can scan the QR codes of a multisig configuration and Passport will offer to import the config.
When Passport is displaying the signed transaction as a QR code series, pressing up/down on the square copper colored d-pad will increase/decrease the screen brightness. Equally, pressing left/right with increase/decrease the QR code density.
How to sign via QR code with Passport and Envoy:
In Envoy:
- Tap on the account to spend from, then tap Send.
- Scan or paste the address being sent to.
- Enter the amount you want to spend.
- Choose your fee rate.
- Envoy will then display a series of animated QR codes that represent the unsigned transaction.
On Passport:
- Log in to the device and click Sign with QR Code.
- Scan the QR codes being displayed by Envoy.
- Review the transaction details on Passport.
- Sign the transaction on Passport.
- Passport will then show its own animated QR codes which represent the signed transaction to be passed back to Envoy.
At this stage it's worth mention that you can:
- Adjust the QR density by tapping left or right on the center directional pad.
- Adjust the screen brightness by tapping up or down on the center directional pad.
- Save the signed transaction to a microSD card for broadcast in the future by clicking on the left copper colored button under the SD card icon.
In Envoy:
- Tap the QR code icon towards the bottom of the screen to open your phone's camera.
- Scan the animated QR codes being displayed by Passport.
- Review the final transaction details then tap Send transaction.
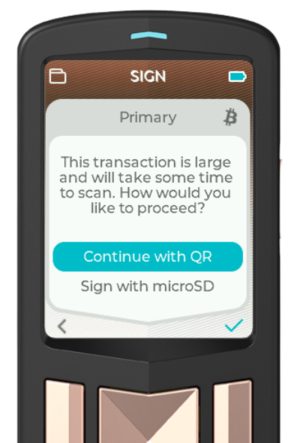
When signing via QR code, if Passport detects that the transaction to be signed is particularly large, you'll be asked if you'd prefer to sign via microSD card. This is because under certain circumstances, very large (in terms of data) transactions can take longer to complete the signing process. This can be exacerbated when using Passport with a wallet on a computer with a poor quality webcam.
¶ Sign with microSD
Sign a transaction by manually selecting a file from an inserted microSD card. Passport supports signing any Partially Signed Bitcoin Transaction 'PSBT' file of the extension .psbt from all common wallet co-ordinator software.
¶ Verify Address
Verify that a receive address belongs to your Passport. Passport starts its search from index #0 and moves outwards from there in small increments.
If at first Passport cannot find the scanned address please continue searching. This is particularly relevant for users importing an existing seed to their Passport.
.png)
- If you do not have any multisig configs stored on Passport, this selection will immediately open the camera to scan a QR code. Simply scan the QR code of any Bitcoin address and Passport will check if the address belongs to you.
- If you have one or more multisig configs stored on Passport, this selection will first open a screen listing your multisig configs. Either select Single Sig or select the name of the desired multisig config. Passport will then open the camera to scan a QR code. Simply scan the QR code of any Bitcoin address and Passport will check if the address belongs to you.
¶ Manage Account
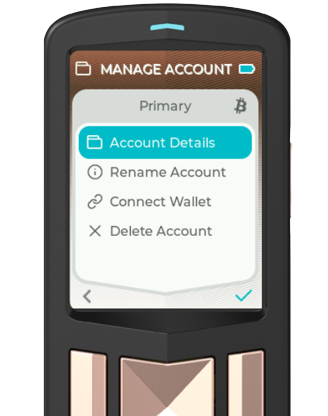
¶ Account Details
View the details of the selected account. These details will include:
- Account name
- Account number (default is #0)
- Envoy Derivation (the derivation path used when pairing with Envoy)
¶ Rename Account
Change the name of the selected account.
¶ Connect Wallet
Connect the selected account to any compatible Software Wallets.
Updated video tutorials featuring Batch 2 Passport and the wallets listed are coming soon!
¶ Explore Addresses
From firmware version 2.3.0, Passport allows for address exploration. This feature allows you to browse through all of the addresses within a specific account or multisig configuration.
Passport allows you to browse by script type and receive or change address indexes. The active address can be displayed as a QR code by pressing on the right copper colored button.
.png)
If multiple accounts are added to Passport, ensure you enter the correct one before exploring addresses. To explore addresses within a passphrase protected account, ensure the passphrase is active on device before using this feature.
¶ Delete Account
Delete the selected account from Passport. Any removed account(s) can be re-added at any time via the New Account menu.
Note that this not possible to delete Account #0 (Primary).